Like the way this is going other than the base…work on that later.
Plotly Plot via Python API
Plotly via Python API
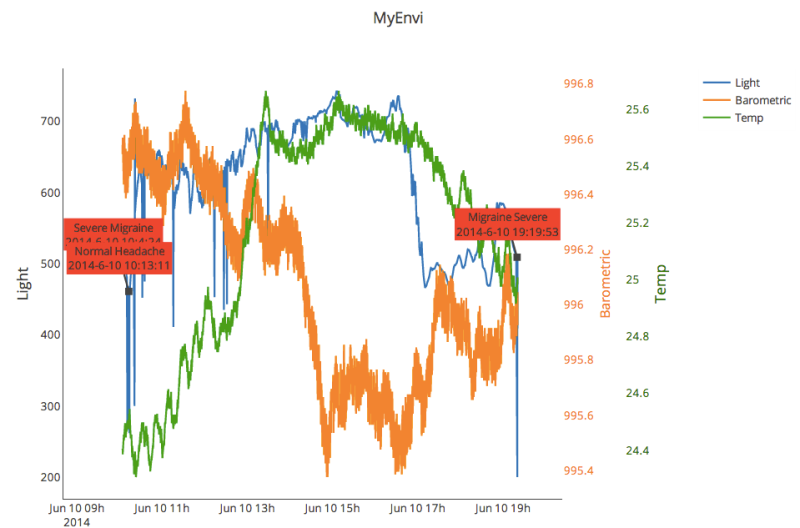
Spent some time working with the Plotly Python API. Able to read my data logger files and upload to a plot with ease. Will need to comment code better I know…just started playing with it and wanted to share. Upload all environmental data and if the additional “Annotation” field exist add that to the plot as well.
More Info at: Plotly Python API
import plotly.plotly as py
from plotly.graph_objs import *

myname = 'plotlyid'
mykey = "plotlykey"

py.sign_in(myname,mykey)

x1 =[]
y1 =[]
y2 =[]
y3 =[]
MyAnnotation = []

f = open("LOGGER26.CSV",'r')
#f = open("smallset.csv",'r')

for lines in f:
	data = lines.split(',')
	x1.append(data[0])
	y1.append(data[1])
	y2.append(data[2])
	y3.append(data[3].strip())

	if len(data)==5:
		print data[4]
		Annotation = {'x':data[0],'y':data[1],'text':data[4] + data[0],'xref':'x','yref':'y','showarrow':True,'arrowhead':7,'bgcolor':'red'}
		MyAnnotation.append(Annotation)

# (2) Make dictionary linking x and y coordinate lists to 'x' and 'y' keys
#     (mandatory in plotly v.1.0.8 and up)
layout = Layout(
	title="MyEnvi",

	annotations=MyAnnotation,

    legend=Legend(
        x=100,
        y=1
    ),
    xaxis=XAxis(
    	domain=[0, 0.8],
        autorange=True,
        showgrid=False,
        zeroline=False,
        showline=True,
        autotick=True,
        ticks='',
        showticklabels=True
    ),
    yaxis=YAxis(
    	title="Light",
    	autorange=True,
        showgrid=False,
        zeroline=False,
        showline=True,
        autotick=True,
        ticks='',
        showticklabels=True
    ),

    yaxis2=YAxis(
        title='Barometric',
        showgrid=False,
        titlefont=Font(
            color='#ff7f0e'
        ),
        tickfont=Font(
            color='#ff7f0e'
        ),
        anchor='x',
        overlaying='y',
        side='right'

    ),

 	yaxis3=YAxis(
 		showgrid=False,
        title='Temp',
        titlefont=Font(
            color='#087804'
        ),
        tickfont=Font(
            color='#087804'
        ),
        anchor='free',
        overlaying='y',
        side='right',
        position = .9
    ),

)
trace1 = dict(x=x1,y=y1, name='Light')
trace2 = dict(x=x1,y=y2, name= 'Barometric',yaxis='y2')
trace3 = dict(x=x1,y=y3, name='Temp',yaxis='y3')
# (3) Make list of 1 trace, to be sent to Plotly
#     (mandatory in 1.0.8 and up)
data = [trace1,trace2,trace3]

fig = Figure(data=data,layout=layout)

plot_url = py.plot(fig, filename='MyEnvi')
f.close()
Short data file snippet:
2014-6-10 19:19:48,508,996.00,24.94
2014-6-10 19:19:49,508,995.95,24.94
2014-6-10 19:19:50,508,995.99,24.94
2014-6-10 19:19:51,508,995.95,24.92
2014-6-10 19:19:53,507,995.93,24.92,Migraine Severe
2014-6-10 19:19:54,507,995.99,24.94
2014-6-10 19:19:55,507,995.96,24.94
2014-6-10 19:19:56,507,996.00,24.92
2014-6-10 19:19:57,507,995.98,24.94
2014-6-10 19:19:58,507,995.97,24.92
2014-6-10 19:19:59,507,995.92,24.92
2014-6-10 19:20:0,507,995.92,24.92
Next steps: Create a way to add the annotation to the data file on the Arduino.
Self Sculpture
TSL 2591 on the Breadboard
Yet to be titled…found object
Table Bases and Pendant Lighting
Battery Powered Arduino
Adafruit to the rescue as I am pushing my project to be portable.
One lithium ion polymer battery and an Adafruit PowerBoost 500 Charger later I was able to get the project untethered from a power source.
Will figure out battery life and such in the near future.
Couple of interesting notes: I already went the alkaline battery route – it worked to a point but the are too bulky for my applications and they had about a 4 hour life span. The combination of Adafruits PowerBoost 500 Charger and the LiPo seems to be (so far) ideal.
The PowerBoost 500 does not work for this application (probably no application) if you connect it via the 2.1mm Power Jack. The Power Jack needs at least 6V to operate properly. I have not yet evaluated using the USB power input. My initial finding showed that it did not work but I am a bit skeptical about my USB connection. Does not really matter much as I know have the PowerBoost 500 connected right to GND and VIN which works great!
Further reading on the subject it appears the only way to power the Arduino from the PowerBoost 500 is the way I ended up doing it — straight to GND and VIN. Makes sense as the USB optional output appears to be for charging other units, not powering a device.
Moved proto type off the breadboard
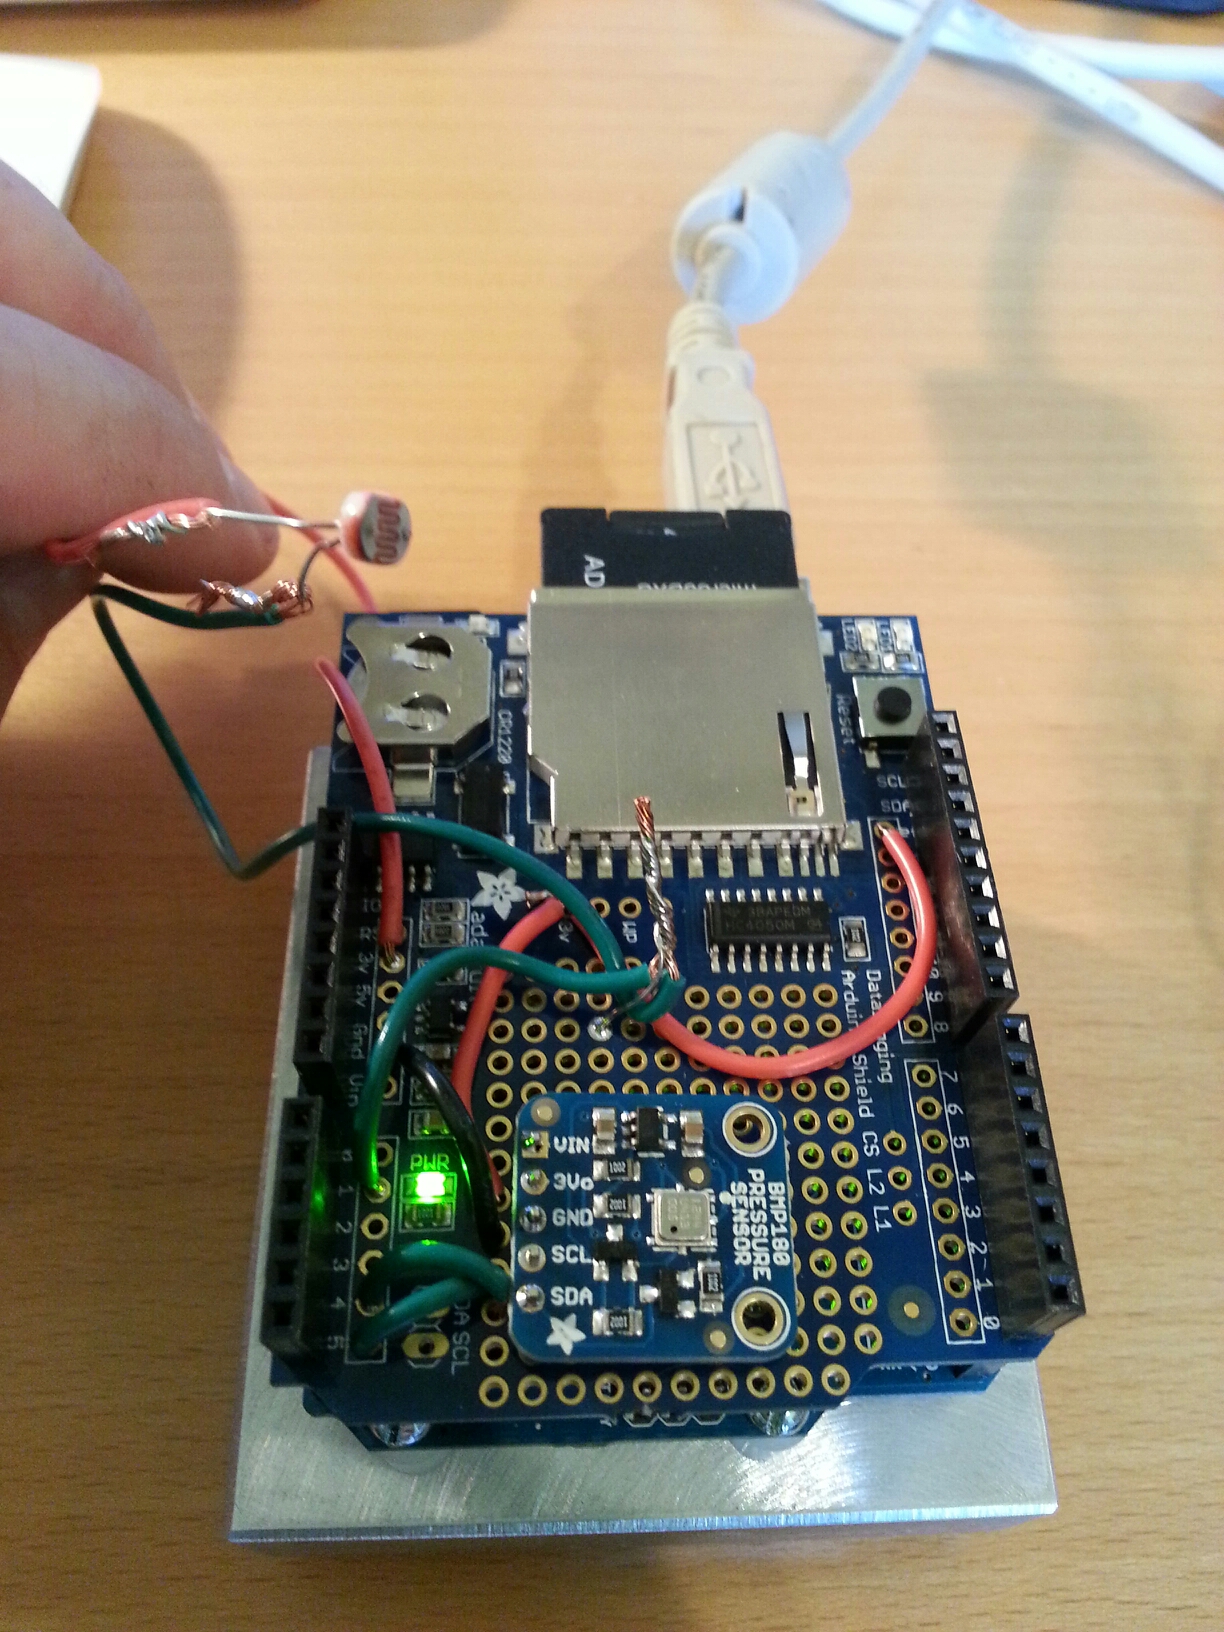
Used the Adafruit Data Logger prototype area. A little sloppy but working. Need to move the BMP180 next time as I realized the pins interfer with the Uno ATmega chip.
Next steps: figure out power and a simple enclosure.
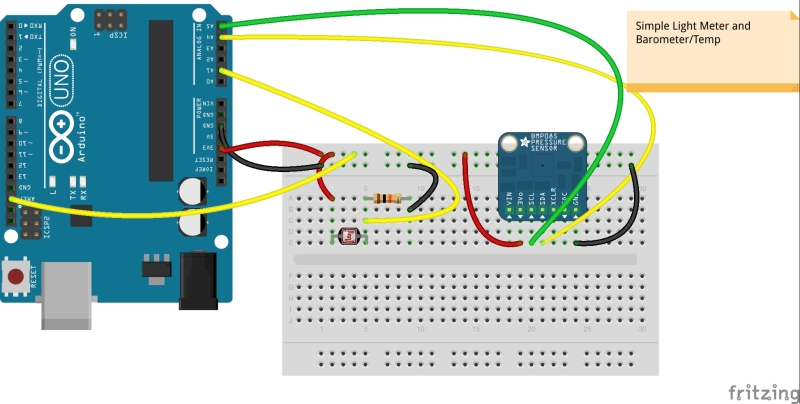
Updated the Fritzing diagram to mostly match the project. There does not appear to be an Adafruit Data Logging part for Fritzing yet and the Barometric sensor has not been updated to the BMP180 (but 85 close enough).


