After messing around with node.js implementation I found some other services that help collect sensor data from devices. They make it pretty easy to embed charts as well:
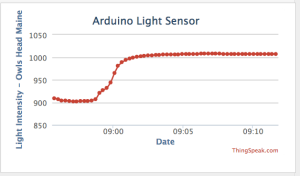
This is a simple light meeter in my living room – connected to ThingSpeak channel. Still getting used to the Charts on ThingSpeak but pretty cool so far. Also will look into there are apps soon enough.
https://thingspeak.com/channels/10735#
ThingSpeak makes it easy: create and account on ThingSpeak and a simple sketch later you have a collector!
Sketch:
[code language=”cpp”]
/*
Arduino –> ThingSpeak Channel via Ethernet
The ThingSpeak Client sketch is designed for the Arduino and Ethernet.
This sketch updates a channel feed with an analog input reading via the
ThingSpeak API (http://community.thingspeak.com/documentation/)
using HTTP POST. The Arduino uses DHCP and DNS for a simpler network setup.
The sketch also includes a Watchdog / Reset function to make sure the
Arduino stays connected and/or regains connectivity after a network outage.
Use the Serial Monitor on the Arduino IDE to see verbose network feedback
and ThingSpeak connectivity status.
Getting Started with ThingSpeak:
* Sign Up for New User Account – https://www.thingspeak.com/users/new
* Register your Arduino by selecting Devices, Add New Device
* Once the Arduino is registered, click Generate Unique MAC Address
* Enter the new MAC Address in this sketch under "Local Network Settings"
* Create a new Channel by selecting Channels and then Create New Channel
* Enter the Write API Key in this sketch under "ThingSpeak Settings"
Arduino Requirements:
* Arduino with Ethernet Shield or Arduino Ethernet
* Arduino 1.0 IDE
Network Requirements:
* Ethernet port on Router
* DHCP enabled on Router
* Unique MAC Address for Arduino
Created: October 17, 2011 by Hans Scharler (http://www.iamshadowlord.com)
Additional Credits:
Example sketches from Arduino team, Ethernet by Adrian McEwen
*/
#include <SPI.h>
#include <Ethernet.h>
// Local Network Settings
byte mac[] = { 0xD4, 0x28, 0xB2, 0xFF, 0xA0, 0xA1 }; // Must be unique on local network
// ThingSpeak Settings
char thingSpeakAddress[] = "api.thingspeak.com";
String writeAPIKey = "YOURWRITEAPIKEYHERE"; // YOUR writeAPIKey here
const int updateThingSpeakInterval = 16 * 1000; // Time interval in milliseconds to update ThingSpeak (number of seconds * 1000 = interval)
// Variable Setup
long lastConnectionTime = 0;
boolean lastConnected = false;
int failedCounter = 0;
// Initialize Arduino Ethernet Client
EthernetClient client;
void setup()
{
// Start Serial for debugging on the Serial Monitor
Serial.begin(9600);
// Start Ethernet on Arduino
startEthernet();
}
void loop()
{
// Read value from Analog Input Pin 0
String analogPin0 = String(analogRead(A4), DEC);
// Print Update Response to Serial Monitor
if (client.available())
{
char c = client.read();
Serial.print(c);
}
// Disconnect from ThingSpeak
if (!client.connected() && lastConnected)
{
Serial.println("…disconnected");
Serial.println();
client.stop();
}
// Update ThingSpeak
if(!client.connected() && (millis() – lastConnectionTime > updateThingSpeakInterval))
{
updateThingSpeak("field1="+analogPin0);
}
// Check if Arduino Ethernet needs to be restarted
if (failedCounter > 3 ) {startEthernet();}
lastConnected = client.connected();
}
void updateThingSpeak(String tsData)
{
if (client.connect(thingSpeakAddress, 80))
{
client.print("POST /update HTTP/1.1\n");
client.print("Host: api.thingspeak.com\n");
client.print("Connection: close\n");
client.print("X-THINGSPEAKAPIKEY: "+writeAPIKey+"\n");
client.print("Content-Type: application/x-www-form-urlencoded\n");
client.print("Content-Length: ");
client.print(tsData.length());
client.print("\n\n");
client.print(tsData);
lastConnectionTime = millis();
if (client.connected())
{
Serial.println("Connecting to ThingSpeak…");
Serial.println();
failedCounter = 0;
}
else
{
failedCounter++;
Serial.println("Connection to ThingSpeak failed ("+String(failedCounter, DEC)+")");
Serial.println();
}
}
else
{
failedCounter++;
Serial.println("Connection to ThingSpeak Failed ("+String(failedCounter, DEC)+")");
Serial.println();
lastConnectionTime = millis();
}
}
void startEthernet()
{
client.stop();
Serial.println("Connecting Arduino to network…");
Serial.println();
delay(1000);
// Connect to network amd obtain an IP address using DHCP
if (Ethernet.begin(mac) == 0)
{
Serial.println("DHCP Failed, reset Arduino to try again");
Serial.println();
}
else
{
Serial.println("Arduino connected to network using DHCP");
Serial.println();
}
delay(1000);
}
[/code]


