RaspberryPi on AWS IoT – MQTT simple PubSub Example

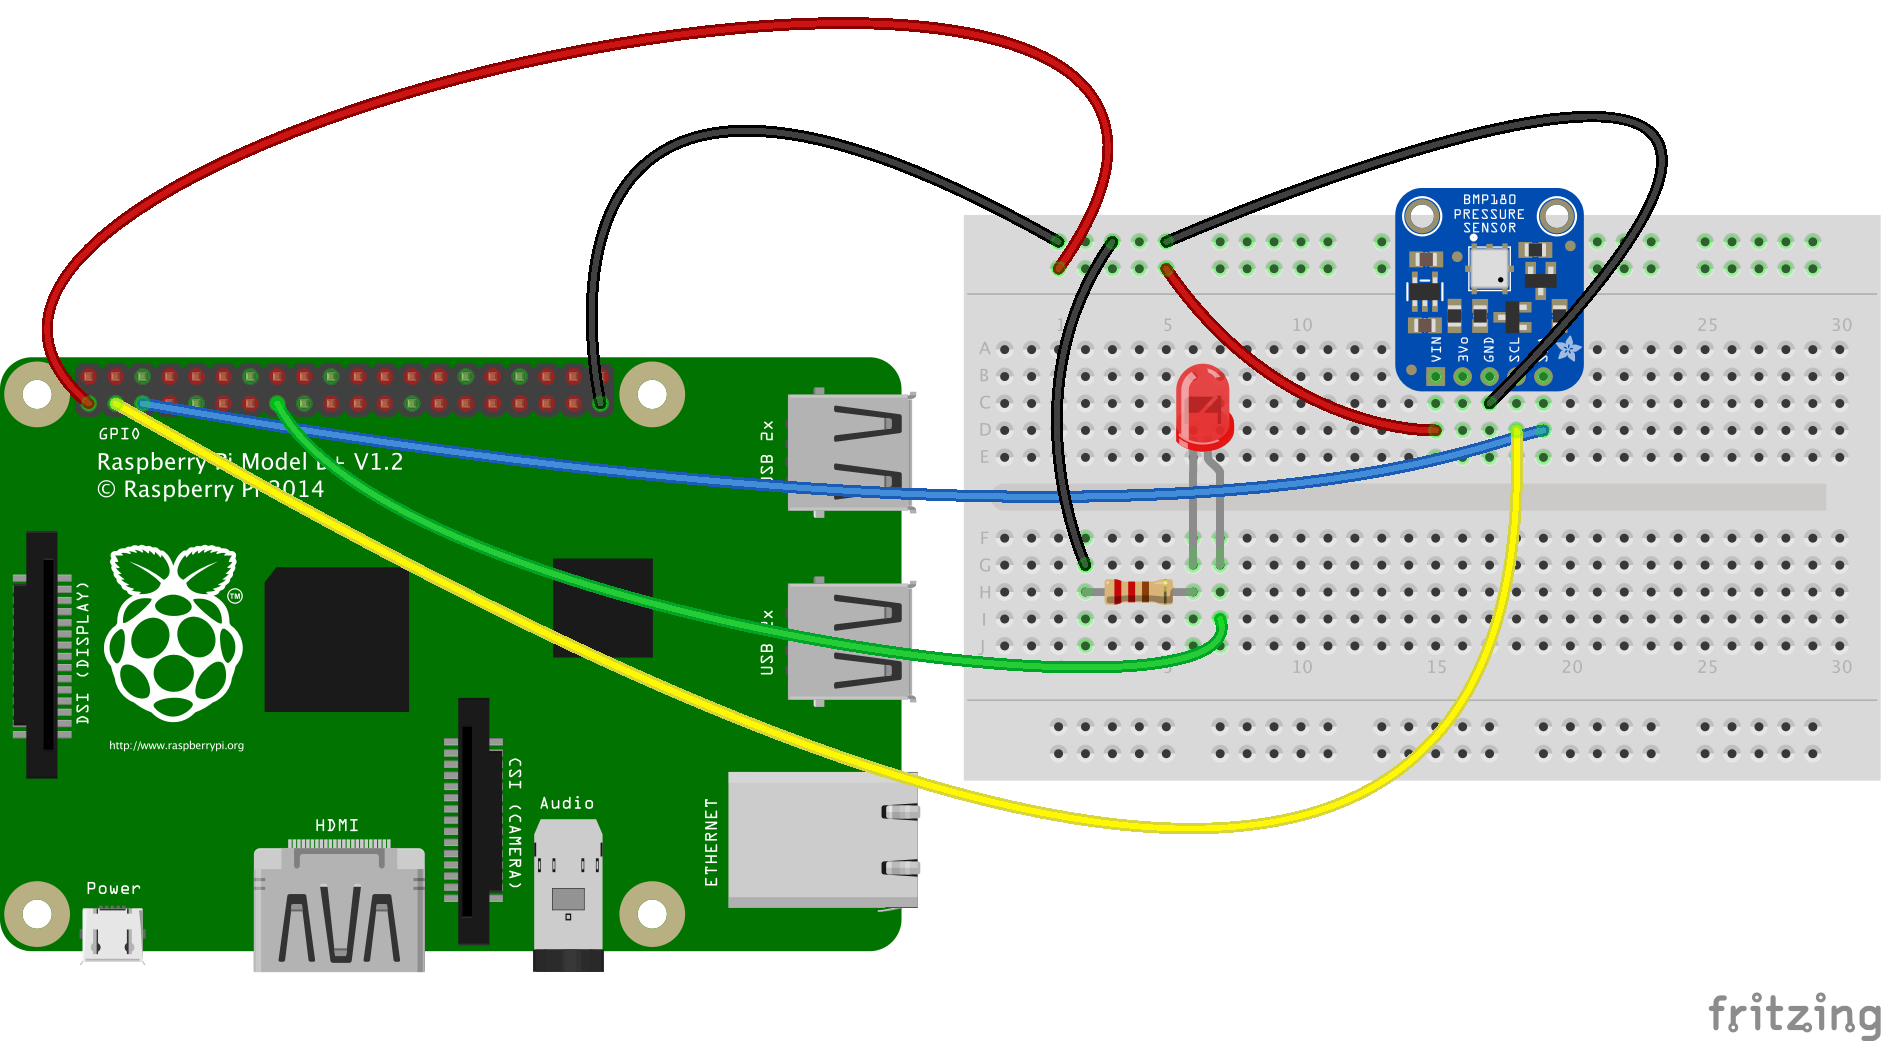
Simple RaspberryPi B+ with BMP180 and LED on GPIO22 for demonstration of AWS/IOT with MQTT.  The following code was modified from the Connecting your RaspberryPi to AWS IoT tutorial.

'''
/*
 * Copyright 2010-2017 Amazon.com, Inc. or its affiliates. All Rights Reserved.
 *
 * Licensed under the Apache License, Version 2.0 (the "License").
 * You may not use this file except in compliance with the License.
 * A copy of the License is located at
 *
 *  http://aws.amazon.com/apache2.0
 *
 * or in the "license" file accompanying this file. This file is distributed
 * on an "AS IS" BASIS, WITHOUT WARRANTIES OR CONDITIONS OF ANY KIND, either
 * express or implied. See the License for the specific language governing
 * permissions and limitations under the License.
 */
 '''

from AWSIoTPythonSDK.MQTTLib import AWSIoTMQTTClient
import logging
import time
import argparse
import json

#import for GPIO Usage on RaspberryPi
import RPi.GPIO as GPIO
#Pins for LED Example
GPIO.setmode(GPIO.BCM)
GPIO.setup(22,GPIO.OUT)

# Import / Setup  BMP Sensor 
import Adafruit_BMP.BMP085 as BMP085
sensor = BMP085.BMP085()

AllowedActions = ['both', 'publish', 'subscribe']

# Custom MQTT message callback 
# Added Temp info from BMP Sensor and logic to turn on/off led
# when temp above 20.2C 
def customCallback(client, userdata, message):
    print("Received a new message: ")
    print(message.payload)
    Mytemp = json.loads(message.payload)
    print("MY TEMP IN THE OFFICE: ")
    print (Mytemp['Temp'])
    if (Mytemp['Temp'] > 20.2):
        GPIO.output(22,1)
    else:
        GPIO.output(22,0)
        
    print("from topic: ")
    print(message.topic)
    print("--------------\n\n")

# Read in command-line parameters
parser = argparse.ArgumentParser()
parser.add_argument("-e", "--endpoint", action="store", required=True, dest="host", help="Your AWS IoT custom endpoint")
parser.add_argument("-r", "--rootCA", action="store", required=True, dest="rootCAPath", help="Root CA file path")
parser.add_argument("-c", "--cert", action="store", dest="certificatePath", help="Certificate file path")
parser.add_argument("-k", "--key", action="store", dest="privateKeyPath", help="Private key file path")
parser.add_argument("-p", "--port", action="store", dest="port", type=int, help="Port number override")
parser.add_argument("-w", "--websocket", action="store_true", dest="useWebsocket", default=False,
                    help="Use MQTT over WebSocket")
parser.add_argument("-id", "--clientId", action="store", dest="clientId", default="basicPubSub",
                    help="Targeted client id")
parser.add_argument("-t", "--topic", action="store", dest="topic", default="sdk/test/Python", help="Targeted topic")
parser.add_argument("-m", "--mode", action="store", dest="mode", default="both",
                    help="Operation modes: %s"%str(AllowedActions))
parser.add_argument("-M", "--message", action="store", dest="message", default="Hello World!",
                    help="Message to publish")

args = parser.parse_args()
host = args.host
rootCAPath = args.rootCAPath
certificatePath = args.certificatePath
privateKeyPath = args.privateKeyPath
port = args.port
useWebsocket = args.useWebsocket
clientId = args.clientId
topic = args.topic

if args.mode not in AllowedActions:
    parser.error("Unknown --mode option %s. Must be one of %s" % (args.mode, str(AllowedActions)))
    exit(2)

if args.useWebsocket and args.certificatePath and args.privateKeyPath:
    parser.error("X.509 cert authentication and WebSocket are mutual exclusive. Please pick one.")
    exit(2)

if not args.useWebsocket and (not args.certificatePath or not args.privateKeyPath):
    parser.error("Missing credentials for authentication.")
    exit(2)

# Port defaults
if args.useWebsocket and not args.port:  # When no port override for WebSocket, default to 443
    port = 443
if not args.useWebsocket and not args.port:  # When no port override for non-WebSocket, default to 8883
    port = 8883

# Configure logging
logger = logging.getLogger("AWSIoTPythonSDK.core")
logger.setLevel(logging.DEBUG)
streamHandler = logging.StreamHandler()
formatter = logging.Formatter('%(asctime)s - %(name)s - %(levelname)s - %(message)s')
streamHandler.setFormatter(formatter)
logger.addHandler(streamHandler)

# Init AWSIoTMQTTClient
myAWSIoTMQTTClient = None
if useWebsocket:
    myAWSIoTMQTTClient = AWSIoTMQTTClient(clientId, useWebsocket=True)
    myAWSIoTMQTTClient.configureEndpoint(host, port)
    myAWSIoTMQTTClient.configureCredentials(rootCAPath)
else:
    myAWSIoTMQTTClient = AWSIoTMQTTClient(clientId)
    myAWSIoTMQTTClient.configureEndpoint(host, port)
    myAWSIoTMQTTClient.configureCredentials(rootCAPath, privateKeyPath, certificatePath)

# AWSIoTMQTTClient connection configuration
myAWSIoTMQTTClient.configureAutoReconnectBackoffTime(1, 32, 20)
myAWSIoTMQTTClient.configureOfflinePublishQueueing(-1)  # Infinite offline Publish queueing
myAWSIoTMQTTClient.configureDrainingFrequency(2)  # Draining: 2 Hz
myAWSIoTMQTTClient.configureConnectDisconnectTimeout(10)  # 10 sec
myAWSIoTMQTTClient.configureMQTTOperationTimeout(5)  # 5 sec

# Connect and subscribe to AWS IoT
myAWSIoTMQTTClient.connect()
if args.mode == 'both' or args.mode == 'subscribe':
    myAWSIoTMQTTClient.subscribe(topic, 1, customCallback)
time.sleep(2)

# Publish to the same topic in a loop forever
loopCount = 10
while True:
    
    Temp = sensor.read_temperature()
    print ("TEMP: " + str(Temp))
    if args.mode == 'both' or args.mode == 'publish':
        message = {}
        message['Temp'] = Temp
        message['sequence'] = loopCount
        messageJson = json.dumps(message)
        myAWSIoTMQTTClient.publish(topic, messageJson, 1)
        if args.mode == 'publish':
            print('Published topic %s: %s\n' % (topic, messageJson))
        loopCount += 1
    time.sleep(2) 


python basicPubSub.py -e YOURAWSIOTSHADOW.us-east-1.amazonaws.com -r root-CA.crt -c MyRasp.cert.pem -k MyRasp.private.key

I am still learning the AWS IoT basics and have posted this as a reminder to myself as to how it got setup. I planned on refining this into tutorial but really did not see the need as the AWS Samples are pretty good. Connecting your RaspberryPi to AWS IoT  is your best place to start.

Pycom WiFi revisit

So I gave it rest after my initial foray into messing with the Pycom device I got back to it.  Updated Atom, updated Pymakr plugin – still need to update firmware.  More on that later.  I found the issue with my USB serial connection woes…turns out (for whatever reason, my TX jumper was disconnected.  The pretty much makes serial connection flakey at best.  Jumper in place and board communication is going well.

WiPy 2.0 and Atom

Yup, dumbass moment with pycom.

Installing Gradle on OSX via HomeBrew

Recent selenium project required use of Gradle.  Quickest way to install was via HomeBrew.  No rocket science but I find if I don’t write this stuff down I lose it quickly.

Install HomeBrew if you don’t have it installed already: goto http://brew.sh/

[code language=”bash” gutter=”false”]/usr/bin/ruby -e "$(curl -fsSL https://raw.githubusercontent.com/Homebrew/install/master/install)"
[/code]

Use HomeBrew to install gradle

[code language=”bash” gutter=”false”] brew install gradle [/code]

Jenkins Install on AWS

Stolen from answer 1 – http://stackoverflow.com/questions/22415977/installing-and-managing-jenkins-on-amazon-linux

sudo yum update
sudo wget -O /etc/yum.repos.d/jenkins.repo http://pkg.jenkins-ci.org/redhat-stable/jenkins.repo
sudo rpm --import http://pkg.jenkins-ci.org/redhat-stable/jenkins-ci.org.key
sudo yum install jenkins
service jenkins start
sudo service jenkins start
sudo chkconfig jenkins on

Jenkins will be used to build/deploy ruby on rails – install Ruby on Rails as prescribed in previous post: Rails on AWS


Ruby On Rails – AWS Linux

I have been working on setting up a Ruby on Rails project and using Amazon Web Services (AWS) to host it.  AWS EC2 instance out of the box of course is not setup to run rails.  After much trial and error I have narrowed down the setup process as listed below.

1 – Setup AWS EC2 Instance (your milage may vary – Assume you have setup EC2 instance before)

I used the following:
AMI – Amazon Linux AMI 2016.03.1 (HVM), SSD Volume Type – ami-f5f41398
Instance Type: General purpose  t2.medium

2 – Setup Rails Environment

Connect to EC2 Instance (ssh via terminal)

ssh -i "****.pem" ec2-user@ec2-XX-XX-XXX-XX.compute-1.amazonaws.com
Always a good practice on new installs

$ sudo yum update

Install rvm for Ruby Version Management

$ gpg2 --keyserver hkp://keys.gnupg.net --recv-keys 409B6B1796C275462A1703113804BB82D39DC0E3
$ curl -L https://get.rvm.io | bash -s stable
$ source ~/.profile 

Install zlib-devel
$ sudo yum install zlib-devel (don't exactly remember why this is needed - might be application specific)

Install openssl
$ rvm pkg install openssl
$ rvm reinstall 2.0.0 --with-openssl-dir=/usr/local/rvm/usr (ruby version up for debate)

my ruby project uses bundler - install it
$ gem install bundler

my application also require javascript
$ sudo yum install nodejs npm --enablerepo=epel

install git
$ sudo yum install git
$ git clone https://github.com/xxxxx/yourrepo.git
$ cd yourrepo

run bundle install (again, my app uses it - your app may have other install steps
$ bundle install
$ rails s
You should see something like: varies depending on application server=> Booting WEBrick

=> Rails 3.2.12 application starting in development on http://0.0.0.0:3000
=> Call with -d to detach
=> Ctrl-C to shutdown server
Connecting to database specified by database.yml
[2016-05-24 13:56:28] INFO  WEBrick 1.3.1
[2016-05-24 13:56:28] INFO  ruby 2.0.0 (2015-12-16) [x86_64-linux]
[2016-05-24 13:56:28] INFO  WEBrick::HTTPServer#start: pid=27261 port=3000


Plotly via Python API

Spent some time working with the Plotly Python API.  Able to read my data logger files and upload to a plot with ease. Will need to comment code better I know…just started playing with it and wanted to share. Upload all environmental data and if the additional “Annotation” field exist add that to the plot as well.

More Info at: Plotly Python API

import plotly.plotly as py
from plotly.graph_objs import *

myname = 'plotlyid'
mykey = "plotlykey"

py.sign_in(myname,mykey)

x1 =[]
y1 =[]
y2 =[]
y3 =[]
MyAnnotation = []

f = open("LOGGER26.CSV",'r')
#f = open("smallset.csv",'r')

for lines in f:
	data = lines.split(',')
	x1.append(data[0])
	y1.append(data[1])
	y2.append(data[2])
	y3.append(data[3].strip())

	if len(data)==5:
		print data[4]
		Annotation = {'x':data[0],'y':data[1],'text':data[4] + data[0],'xref':'x','yref':'y','showarrow':True,'arrowhead':7,'bgcolor':'red'}
		MyAnnotation.append(Annotation)

# (2) Make dictionary linking x and y coordinate lists to 'x' and 'y' keys
#     (mandatory in plotly v.1.0.8 and up)
layout = Layout(
	title="MyEnvi",

	annotations=MyAnnotation,

    legend=Legend(
        x=100,
        y=1
    ),
    xaxis=XAxis(
    	domain=[0, 0.8],
        autorange=True,
        showgrid=False,
        zeroline=False,
        showline=True,
        autotick=True,
        ticks='',
        showticklabels=True
    ),
    yaxis=YAxis(
    	title="Light",
    	autorange=True,
        showgrid=False,
        zeroline=False,
        showline=True,
        autotick=True,
        ticks='',
        showticklabels=True
    ),

    yaxis2=YAxis(
        title='Barometric',
        showgrid=False,
        titlefont=Font(
            color='#ff7f0e'
        ),
        tickfont=Font(
            color='#ff7f0e'
        ),
        anchor='x',
        overlaying='y',
        side='right'

    ),

 	yaxis3=YAxis(
 		showgrid=False,
        title='Temp',
        titlefont=Font(
            color='#087804'
        ),
        tickfont=Font(
            color='#087804'
        ),
        anchor='free',
        overlaying='y',
        side='right',
        position = .9
    ),

)
trace1 = dict(x=x1,y=y1, name='Light')
trace2 = dict(x=x1,y=y2, name= 'Barometric',yaxis='y2')
trace3 = dict(x=x1,y=y3, name='Temp',yaxis='y3')
# (3) Make list of 1 trace, to be sent to Plotly
#     (mandatory in 1.0.8 and up)
data = [trace1,trace2,trace3]

fig = Figure(data=data,layout=layout)

plot_url = py.plot(fig, filename='MyEnvi')
f.close()

Short data file snippet:

2014-6-10 19:19:48,508,996.00,24.94
2014-6-10 19:19:49,508,995.95,24.94
2014-6-10 19:19:50,508,995.99,24.94
2014-6-10 19:19:51,508,995.95,24.92
2014-6-10 19:19:53,507,995.93,24.92,Migraine Severe
2014-6-10 19:19:54,507,995.99,24.94
2014-6-10 19:19:55,507,995.96,24.94
2014-6-10 19:19:56,507,996.00,24.92
2014-6-10 19:19:57,507,995.98,24.94
2014-6-10 19:19:58,507,995.97,24.92
2014-6-10 19:19:59,507,995.92,24.92
2014-6-10 19:20:0,507,995.92,24.92

Next steps: Create a way to add the annotation to the data file on the Arduino.

Using Plot.ly with Adafruit Data Logging Shield

I have played with a few IOT type services for showing off data collected and or sent from Arduino (and other micro controller devices) and have settled on Plot.ly for now.

I have used ThingSpeak and Xively as well but found Plotly worked better for importing from the data logger disk than the others. Xively appear to be more “live update” oriented and not as well geared for file upload of large data sets.


Plot.ly Graph from Arduino Barometric and Light Project

Arduino, Ethernet Shield, Node.js and AWS OpsWorks

After going though a lot of the great examples I wanted to dive into connecting the Arduino to the internet and figure out a way to push sensor data to the web for later consumption. Thanks to Remote logging with Arduino and Node.js at FRENKI.NET I was able to get the info I needed to setup a simple data collector application.

[code language=”cpp”]
//Sending one Analog Value to a Node.js server
//Used AWS OpsWorks and created basic Stack to deploy a node.js instance
//Stolen from FRENKI.NET

#include
#include
#include

byte arduinoMac[] = { 0xDE, 0xAD, 0xBE, 0xEF, 0xFE, 0xED };
// desired IP for Arduino
IPAddress arduinoIP(192, 168, 1, 100);
// port of Arduino
unsigned int arduinoPort = 8080;

// IP of node.js server setup to recieve the data
IPAddress receiverIP(00, 00, 00, 00);
// Port on node.js server that is listening to UDP traffic
unsigned int receiverPort = 7777;

EthernetUDP Udp;

int sensorPin = A4; // Choose whatever sensor pin you would like to use
int sensorValue;

void setup() {
Ethernet.begin(arduinoMac,arduinoIP); //Initialize Ethernet UDP and Serial port
Udp.begin(arduinoPort);
Serial.begin(9600);
}

void loop() {
sensorValue = analogRead(sensorPin); // Read sensor value and store in sensorValue
byte valueInBytes[2] = {lowByte(sensorValue), highByte(sensorValue)}; //convert it to a byte array for the UDP Transfer
// Debug info for figuring out how byte array works
Serial.print("Low: ");
Serial.println(lowByte(sensorValue));
Serial.print("High: ");
Serial.println(highByte(sensorValue));

// Send UDP Packet to node.js server
Udp.beginPacket(receiverIP, receiverPort); //start udp packet
Udp.write(valueInBytes, 2); //write sensor data to udp packet
Udp.endPacket(); // end packet
// Repeat every 5 seconds
delay(5000);
}
[/code]

node code:

Here is a snippet of node.js code used to receive the Arduino data. I used a simple AWS OpsWorks Deployment of an node.js instance. Add the following code to a file…arduindocollect.js and then run #node arduinocollect.js…

[code]

var dgram = require("dgram");
var server = dgram.createSocket("udp4");
var fs = require(‘fs’);

var crlf = new Buffer(2);
crlf[0] = 0xD; //CR – Carriage return character
crlf[1] = 0xA; //LF – Line feed character

server.on("message", function (msg, rinfo) { //every time new data arrives do this:
console.log("server got: " + msg.readUInt16LE(0) + " from " + rinfo.address + ":" + rinfo.port); // you can comment this line out
fs.appendFile(‘mydata.txt’, msg.readUInt16LE(0) + crlf, encoding=’utf8′);//write the value to file and add CRLF for line break
});

server.on("listening", function () {
var address = server.address();
console.log("server listening " + address.address + ":" + address.port);
});

server.bind(7777); //listen to udp traffic on port 7777

[/code]

AWS – Make sure you update the Security Group to allow UDP on 7777 or whatever UDP Port you decide to use.